Showing posts with label Appetizers. Show all posts

Monday, November 27, 2023

Leftover Turkey Salad Spread


Honestly, the reason we buy a whole huge turkey for Thanksgiving is for the leftovers.  Cold turkey for a midnight snack, yes please.  Turkey and noodles, absolutely.  But this turkey salad spread is what my husband absolutely goes crazy over.  His grandma always made it the week after Thanksgiving and it is something we all crave and look forward to.  The consistency isn't what you expect when think of turkey or chicken salad.  It's a spread.  It's delicious on your favorite bread or crackers.  It would also be amazing with a thin slice of tomato and some thin sliced red onion.  For us, we prefer it alone on a leftover roll.

Leftover Thanksgiving turkey, dark and/or white meat, we usually use white

Mayonnaise

Dill Pickles

Salt and Pepper

Fill a food processor with as much turkey as you desire.

Add a couple dollops of mayonnaise.

Cut 3-4 dill pickles into 1 inch chunks and throw them in along with a sprinkle of salt and pepper.

Pulse your food processor to get everything started and then turn it on high.  Scrape the sides of the bowl occasionally until it's a smooth, paste consistency.  I usually have to add a bit more mayonnaise and salt and pepper and just taste as I go until it's how we like it.

Serve on your favorite bread, cracker, or rolls.  Keep refrigerated.  

Monday, November 13, 2023

Stuffing Balls


Another favorite for our Thanksgiving table is the super easy and yummy Stuffing Ball appetizer!  These were my favorite when I was a kid!

1 6oz box Stove Top Stuffing, chicken flavor

1 egg, beaten

1/3 cup butter, melted

3/4 cup water

1 cup swiss cheese, shredded

Preheat your oven to 350 degrees.  Line a baking sheet with parchment paper.

In a medium mixing bowl combine the egg, butter, and water.  Stir in the stuffing mix and cheese.

Form the mixture into bite size balls and place on the parchment lined baking sheet 1 inch apart.  

Bake for 8 minutes, flip them over, and bake 8 more minutes.

Aunt Norma's Cheese Ball


Thanksgiving is NEXT WEEK and I finally got my hands on my Aunt Norma's cheese ball recipe.  This cheese ball is so good my baby sister HAD to have it for her wedding reception.  We made so many cheese balls that week I dreamt of them for a very long time.  I love to eat this with just a good 'ol Ritz cracker.  

2 pkgs. cream cheese, softened

2 Tablespoons butter, softened

2 jars dried beef, minced

3/4 cup chopped pecans

1 tsp. Worcestershire sauce

1 tsp. dried onion flakes

1 tsp. horseradish

In a medium bowl mix together the cream cheese, butter, Worcestershire sauce, horseradish, onion flakes, and one jar of the minced dried beef.  Form the mixture into a ball.

In a small mixing bowl, combine the remaining minced dried beef and pecans.  Spread the beef and pecan mixture evenly over a flat surface.  Roll the ball around the mixture until the entire surface is covered.  Place the cheese ball on your serving plate, cover, and refrigerate until chilled.  If you're not ready to place it on your serving plate, wrap the ball in plastic wrap and place in the fridge until you're ready to serve.  Serve with your favorite crackers.

Monday, August 8, 2022

Crab Rangoon


 These crab rangoons are RIDICULOUSLY good!  My family could eat themselves sick on them and then beg for more. They're hot and creamy and cook in seconds.  If your family spots the ingredients in the fridge, they will NOT leave you alone until you make them.  They're seriously better than take out!


1 package Wonton wrappers

2 blocks cream cheese, softened

4 sticks of imitation crab meat (or about half a cup), diced

1/4 cup green onion, chopped (just the green part)

2 Tablespoons powdered sugar

pinch of salt

coconut oil or your favorite oil for frying

In a medium mixing bowl combine the softened cream cheese, crab meat, green onion, powdered sugar, and salt.

Take a wonton wrapper and place about 1/2 tablespoon of the mixture into the center of the wrapper.  Dip your finger in some cold water and wet all of the edges of the wrapper.  By wetting the edges, the dough will seal completely when you fold and pinch the edges together.

Now, you can design your rangoon anyway you like.  I made mine like the picture.  Simply fold two opposite corners together and pinch the top to seal.  Then bring the other two corners together and pinch to seal making a little pocket of filling.  Alternatively, you could bring two corners together to make a triangle and seal the edges to look like a paper football.

In a large cast iron skillet (or your favorite vessel for deep frying), melt some coconut oil until you have approximately 1/4 inch of oil in the bottom of your skillet.  I like to sacrifice a wonton wrapper to see if the oil is hot enough.  If you've never worked with wonton wrappers before, it's also a great way to see how quickly they cook.  Gently place an empty wonton wrapper into the hot oil.  If it bubbles and puffs right away, then your oil is hot enough.  (Enjoy a delicious wonton cracker with your tester wrapper!)

Working in batches, carefully place the wontons into the hot oil.  Don't add too many at once.  They cook quickly and it's easy to burn them if you're working with too many.

After a few seconds, you'll see the bottoms beginning to brown.  Turn the wontons into the oil until all sides of the rangoon are golden brown.  Remove from the oil onto a paper towel lined plate.

Serve warm and watch them disappear!  Yields approx. 30 crab rangoons.

Sunday, July 24, 2022

Cowboy Candy (Candied Jalepenos)


Cowboy Candy.  Candied Jalepenos.  Coyote Crack.  It goes by many names but it's all the same amazing jar of addicting, sweet, mildly spicy goodness.  There are endless ways you can use these guys.  Our absolute favorite is on our cheeseburgers.  We also love to pour it over a block of cream cheese to eat with crackers.  Whatever you end up using it on, it's guaranteed to be delicious.  

This recipe is a bulk recipe and you'll be thankful for that when your friends taste them.  They'll beg you for a jar and you'll have one ready to go for them.  The leftover syrup is DELICIOUS to use for basting any meat you're grilling or making your own salad dressing in place of honey.


10 lbs. fresh jalepenos (firm and washed)

6 cups apple cider vinegar

18 cups white sugar

1 1/2 tsp. turmeric 

1 1/2 tsp. celery seed

9 tsp. granulated garlic

3 tsp. ground cayenne pepper

Grab a pair of food safe gloves and chop off the stems of all of the jalapeños.  Discard the stems.  

Slice the peppers into uniform 1/4 inch round slices and set aside.  It's a lot of slicing, not gonna lie.  Pop in an audio book and get comfy.

In a LARGE pot, bring the vinegar, sugar, turmeric, celery seed, garlic, and cayenne to a boil.  

Reduce the heat and simmer for 5 minutes.  

Raise the heat to boiling again and add the pepper slices.  (Open all of your doors and windows at this point.)  

Return the syrup to a hard boil, reduce the heat again and simmer for *exactly* 4 minutes.  

Use a slotted spoon and transfer the peppers into clean, sterile canning jars with 1/4 inch of headspace left at the top of the jar.

Once all of the peppers are in jars, turn the heat back up on the syrup and boil hard for another 6 minutes.

*CAREFULLY* ladle the boiling hot syrup into the jars to cover the jalapeños.

Insert a wooden skewer or chopstick into the jar all the way to the bottom two or three times to release any trapped air bubbles.  Adjust the level of syrup as necessary.  You still want to have 1/4 inch headspace in your jars.

Wipe the rims of the jars with a clean, damp paper towel and place new lids and rings onto the jars to fingertip tightness.  

At this point, you can allow them to cool on the counter top then transfer to the fridge to store.

If you would like to can them, place the jars in a water bath canner.  Cover the jars with water by 2 inches.  Bring the water to a full rolling boil and process the jars for 10 minutes for half-pint jars or 15 minutes for pint jars. 

When the timer goes off, use canning tongs to transfer the jars to a cooling rack.  Leave them to cool on the counter for 24 hours.  

Check the lids for a proper seal.  If there are any that didn't seal, stick them in the fridge to use first.  

If you can stand it, let your peppers hang out for about 2 weeks or a whole month to let them get nice and yummy.  If you have to dig into them before that, go for it.  I won't say anything!  

Yields approximately 8 pint size jars.

You'll notice you have some leftover syrup.  KEEP IT!  You can use it in SO many recipes.  Add it to grilled meats, use it in place of honey, add some to your potato salad, use it in any Mexican recipe, add some to your bbq sauce, brush it on your corn on the cob, brush it on grilled shrimp skewers...literally anything you think it would be tasty on!  If you have too much to use in the next month or so, feel free to throw it in a canning jar and process it while you process your jalapeños.  


Wednesday, June 24, 2020

White Bread Dough

Here's another great dough recipe for your bread machine!  This is just a plain, white bread dough that you can use for a variety of things.  I use it for my Sausage Bread, but you could also put it in a bread pan and bake it as a loaf, roll it into strips and make breadsticks, roll it into balls and make rolls....whatever you want.  But I highly recommend the Sausage Bread.  

1 cup hot water
1 tablespoon milk
2 tablespoons extra virgin olive oil
2 tablespoons raw, organic honey
2 tablespoons organic sugar
1 tsp. pink Himalayan salt
3 cups organic flour
2 tsp. active dry yeast

Put all of the ingredients into the bread machine pan in the order listed.  
Select the Dough setting on your bread machine and let the bread machine to make your dough for you over the next couple of hours.  
Once the dough cycle is complete, remove your dough from the bread machine pan.

Here's where you can do whatever you want with it.  

If you just want to make a loaf of white bread, put it in a greased loaf pan, allow it to rise in a draft free area for 30 minutes and then bake at 350 for 30 minutes.

For breadsticks, section the dough out into your desired size, roll into long lengths, allow it to rise for 30 minutes and bake at 350 on a parchment lined baking sheet until golden brown.  If you want, you can brush it with egg wash and sprinkle with sesame seeds or garlic salt before baking.

Sausage Bread

Every time I think about this bread I crave it until I have it.  This is my mother-n-law's recipe and it's amazing.  I remember going to her house after school and she'd have a loaf of this ready sometimes.  
Fun fact: My husband and I are middle school sweethearts.  They lived just a few miles from our middle/high school and sometimes between school and football games, a group of friends and I would go to their house.  She fed *a lot* of us throughout our high school days.
Be warned...this bread is v addicting.

1 loaf of white bread dough, frozen + thawed or fresh homemade
1lb. Jimmy Dean Sausage (I love Sage.)
1/3 cup parmesan cheese
2 eggs, lightly beaten

Preheat oven to 350 degrees.  Place a sheet of parchment paper on a cookie sheet and set aside.  

Have your dough prepared ahead of time.  Either thaw a store bought frozen white bread dough loaf, or prepare your homemade dough in the bread machine.  

Sausage
In a medium skillet, cook and crumble sausage.  Drain any excess grease and set aside to cool slightly.  You don't want to scramble the eggs.  Add cheese and eggs and mix thoroughly.

Bread
Roll out bread dough into a rectangle.  
Spread sausage mixture onto rolled out dough.
Roll up the dough like a jelly roll or cinnamon roll and pinch the seams together.
Let the dough rise for 30 minutes.
Place the bread in the oven and bake for 40 minutes.  

**If you don't have time for that full 30 minute rise, no worries.  I've thrown it right in the oven before and it's come out fine.  It's pretty forgiving. 

Tuesday, June 23, 2020

Taco Flatbread

These are a lot of fun to make and your kiddos can join in on the fun to!  You can personalize them as much as you want but my husband and I love them like this!

2 Roma tomatoes, diced
2 Poblano peppers, cored, seeded, and diced
1/4 cup cilantro, finely chopped
1 jalapeño, sliced into thin rings
1lb ground beef
2 tablespoons Southwest Seasoning (I use the Simply Organic brand), divided
4 flat breads
1 cup Mexican blend shredded cheese
1/2 cup Monterey Jack shredded cheese
1/2 cup sour cream
hot sauce to taste, optional

Preheat oven 450 degrees and place an aluminum foil lined baking sheet inside.  
Heat a drizzle of extra virgin olive oil in a medium skillet over med-high heat.  Add the poblano peppers and cook 3-4 minutes, tossing until lightly charred.  Season with salt and pepper.  Remove the cooked poblano peppers from the pan and set aside.
Add another drizzle of olive oil and add the ground beef.  Season generously with salt and pepper and crumble until cooked through.  Add the charred poblano, diced tomato, and 2tsp. of the Southwest seasoning.  Remove the pan from the heat.

Now let's toast the flatbreads.  Remove the hot baking sheet from the oven and place 4 flatbreads onto the baking sheet.  (If you can only fit 2, you'll have to toast them in batches or use 2 baking sheets.)  Drizzle each flatbread with extra virgin olive oil and sprinkle with salt and pepper.  Toast them in the oven until golden brown and slightly crispy, 2-4 minutes.  Watch them closely!

Remove the flatbreads from the oven and divide the beef mixture evenly between the 4 flatbreads.  Sprinkle both cheeses over each flatbread.  Return the flatbreads to the oven and bake until the cheeses melt, about 2 minutes.  

In a small bowl stir together the sour cream, remaining Southwest Seasoning, and 1 1/2 tablespoons of water.  Season with salt and pepper and drizzle the mixture (crema!) over the flatbreads.  Sprinkle with chopped cilantro and if you want a little kick, as many jalapeño rings and hot sauce as you like.  Cut the flatbread into 4's and serve!

Cucumber Sandwiches

This is a delicious, light summer lunch that is FULL of flavor.  If you want to take these to a party, you can make them fancy by cutting them into small triangles or use a cookie cutter to cut your desired shapes. (And munch on the "scraps".)  These are SUPER yummy on my Dill Bread.

Fresh cucumbers of your choice, peeled, and sliced into 1/4 inch slices.
White or Dill Bread slices
2 blocks cream cheese, softened
1 packet of Italian Dressing Mix

In a medium mixing bowl, combine cream cheese and Italian Dressing mix and stir until fully incorporated.  

Begin assembling a sandwich by spreading a generous amount of the cream cheese mixture on two slices of bread.  
Take one piece of the cream cheese topped bread and place cucumber slices on the cream cheese, making sure the slices overlap just slightly, as pictured.  
Top the sandwich with the other slice of bread, cream cheese side down.
Repeat for as many sandwiches as you need.  
Cream cheese mixture stays fresh in the fridge for several days.

Enjoy immediately as is or cut into desired shape.  

Parmesan-Italian Herb Bread

I absolutely love herbed breads.  They're amazing with any Italian dish but man do I love them for bread dipping.  I also love French Bread for bread dipping!

1 1/4 cups warm water
2 tablespoons grass fed butter
3 1/3 cups organic flour
2 tablespoons grated parmesan cheese
1 tablespoon dry milk
1 tablespoon organic sugar
2 tsp. dried Italian seasoning
1 1/2 tsp. pink Himalayan salt
1 3/4 active dry yeast

Add the liquid ingredients and butter to pan in the order listed.  
Add the dry ingredients in the order listed, except yeast.  Tap the pan to settle the dry ingredients and level off with your finger, if needed.
Make a well in the center of the dry ingredients and add the yeast to the well.
Lock the bread machine pan into place and close the lid.  
Program your bread machine for the Basic setting, choose the crust color you like, and press Start.
Once it's finished, remove the pan from the machine and allow to cool for 5-10 minutes before shaking the bread out of the pan to cool completely.  

Wednesday, April 8, 2020

Matza + Matza Pizzas

Quarantine has made people do things they've never considered.  One of my favorite things about this whole experience is that I'm seeing people explore sourcing their own food.  I'm in a few facebook groups about keeping chickens in Alaska and those groups have exploded recently with people learning all about chickens so they don't have to depend on a store for their eggs.  The gardening groups are booming with new members learning everything they can about harvesting their own food and it makes me happy.  You can't find yeast anywhere right now because people are baking their own bread in their own ovens for their families.  Flour is hard to come by!  Instagram has a fantastic hashtag #socialdistancingsourdough with people of all ages and all backgrounds all of the sudden baking the most beautiful loaves of sourdough!

Another one of my favorite things about this quarantine experience is that although I now live in Alaska, my church in Virginia has started live-streaming their services.  Every year, on the Wednesday before Easter, they hold a special Remembrance Service and we partake in communion.  I didn't have a single saltine cracker in this whole house.  And I wasn't about to go out to the grocery store just for saltines when all I needed was about 1/4 of a cracker.   So I started googling and found a recipe for Matza and I had all of the ingredients for it!  Whew!  The only "problem" was that it made 8 sheets of Matza and literally only needed two small pieces about the size of your thumbnail.  What in the world do you do with a TON of leftover Matza?!?!  

The answer is PIZZA!!  And not just plain 'ol pizza...I got creative!  We haven't been to a restaurant in weeks and we were so craving our favorite pizza place here in Fairbanks.  So I decided to make a bunch of different, personal size pizzas for us all to have a delicious pizza buffet at home.  

So first I'll put the recipe here for the Matza.  Then I'll list all of the different pizzas I made and their ingredients.  The possibilities are endless.  You can put anything and everything you want on these Matza sheets...they're a blank canvas!  Leave a comment with what you toppings you did!

Matza
4 1/2 cups all purpose flour
3/4 cup warm water plus a splash more if the dough is too dry
3 tablespoons extra virgin olive oil (I eyeballed it and probably used close to 4...delicious!)
1 teaspoon Himalayan pink salt
More extra virgin olive oil for brushing

Preheat an oven or a griddle to 500 degrees.
(If you're using an oven, you're going to cook these on a baking sheet that you've flipped upside down. Stick the upside down baking sheet in the oven while it preheats...you want the baking sheet screaming hot.) 

Combine all of the ingredients in a large mixing bowl.  If the dough is too dry, add a splash more water.  My dough felt like a tough, yet cohesive, ball that was not sticky.
Divide the dough into 8 pieces.
On a floured surface, roll out each piece until it's cracker thin.  Mine looked v rustic.
Use a fork and prick holes all over each piece.  This will keep it from rising too much.
Brush a coating of olive oil on top of each piece.

I cooked these two at a time.  Slide dough piece onto a large spatula and slide it onto the cookie sheet or griddle.  Cook for 2 1/2 minutes on one side, flip with a pair of tongs, and cook it on the other side for another 2 1/2 - 3 1/2 minutes until they're starting to turn golden in places and a hard, cracker like sheet.  Remove from the oven to cool.  Continue until all pieces have been cooked.  

Now, if you're using these for communion purposes, you're technically supposed to do all of the mixing and cooking in less than 18 minutes.  After 18 minutes the dough and the water begin to react with the natural yeast and bacteria in the air and fermentation begins which, if you're familiar with communion practices, you need an unleavened (unfermented) bread.  (P.S. Christ took care of all of this on the cross for us and we do this out of remembrance for His sacrifice for us...it's all about the heart attitude you have as you partake.  If all you have is a piece of sandwich bread...or WHATEVER...that's fine.  It's not about the bread.)  We can talk more about that if you want.  Shoot me an email.  Also, these are not technically Kosher so if that's important you, you'll need to find a different recipe.  

Ok.  So you've had quarantine communion.  Now what do you do with the other 7 8/10th's of Matza sheets?  PIZZA!!!  Amazing, restaurant tasting, pizza!  I made 5 different pizzas and had 2 Matza sheets left that my kids ate plain (it's actually really good).  

Just build these pizzas as you would any other pizza.  Sauce and toppings, pop on a parchment lined baking sheet and bake in an oven at 350 degrees.  I got kind of impatient and cooked them under the broiler...whatever works for you.

Dilly Dilly Pizza
Ranch dressing
Johnny's Garlic Spread (buy it at Costco)
Shredded Parmesan cheese (the real kind, not the green shaker...the green shaker kind comes later)
Sprinkle of dried dill
Cover every inch of the cheese in dill pickles
Bake until cheese is melted and warmed trough
As soon as you take it out of the oven, sprinkle with more Johnny's Garlic Spread, parmesan cheese (in the green can), and a tiny sprinkle of more dried dill

Taco Pizza
Spread Jacks Cantina Salsa over the crust
Cover in leftover taco meat
Top with shredded cheddar
Bake
Serve with sour cream

3 Cheese Garlic
Olive oil
Johnny's Garlic Spread
Shredded Parm
Shredded mozz
Shredded Cheddar
Sprinkle of pink Himalayan Salt
Bake

Greek
Olive oil
Johnny's Garlic Spread
Parmesan cheese (in the green can)
Shredded Parmesan cheese
Halved kalamata olives
Bake

Egg & Cheese
Olive oil
Shredded mozzarella
Shredded cheddar
2 eggs cracked on top
salt and pepper
(ham or sausage would've been amazing on this too, but I didn't have any on hand)
Bake


Tuesday, April 3, 2018

Deviled Eggs

These are, hands down, the BEST deviled eggs EVER.  My aunt makes them for every holiday and they are to DIE for!

1 dozen hard boiled eggs, peeled
Woeber's Jalepeno Mustard
mayo
salt
pepper
paprika

Split each hard boiled eggs in half, length wise.
Remove the yolks and place in a medium mixing bowl.
Place the whites on a serving platter and set aside.

Take a fork or a whisk and crumble the yolks until they're all in tiny pieces.
Add enough mayo to make it creamy and at least 3 Tablespoons of the jalapeño mustard. (Side note: the jalapeño mustard doesn't make it spicy at all.  So if you're not into spice, no worries, these are NOT spicy AT ALL.  But there's something about that mustard that just sets this recipe apart from the rest.)
Keep stirring and combining the yolks, mayo, and mustard until it's the consistency you like and the yolks are smooth and creamy.
Add salt and pepper to taste.
Put the yolk mixture into a sandwich baggie and snip the corner off.
Pipe the yolk mixture into the center of the whites.
If you're Team Paprika then sprinkle it on top of all of the eggs.  If you're Team NO Paprika, skip it!

Monday, July 17, 2017

Veggie Pizza

This is one of my family's favorite appetizers!  There are SEVERAL variations of veggie pizza, but this one is muh fave.  Have fun with it, use the veggies you like, leave off the ones you don't.  But for the love of all that's good...sprinkle on the cheddar.

2 cans crescent rolls
1 (8oz.) pkg. cream cheese, softened
1/2 cup sour cream
1 tsp. dried dill
1/4 tsp. garlic powder
pinch of salt
1/2 cup each (eye ball it) of your favorite veggies, chopped.  I like to use broccoli florets, cauliflower, diced roma tomatoes, diced cucumber, shredded carrots, 
1/2 cup (or more) shredded cheddar

Preheat oven to 375 degrees.  
Unroll both cans of crescent dough and place them on a cookie sheet, pinching the seams together to make one big sheet of crescent dough.
Bake for 13-17 minutes or until golden brown and cool completely.
In a small bowl, mix the cream cheese, sour cream, dried dill, garlic powder, and salt.  Spread the mixture over the cooled dough sheet.  
Top with veggies, sprinkle with cheese, cut into squares, and serve immediately.  You can also cover it and stick it in the fridge for 1-2 hours before serving.  

Sunday, May 21, 2017

Sausage Crescent Bites

It doesn't get any easier than this for breakfast.  It's perfect for having friends over for breakfast, or taking to a brunch, or a shower, or overnight guests.  Super simple and just a few ingredients.

1lb. of your favorite sausage, browned and crumbled (we like Jimmy Dean Sage sausage)
2 pkgs. crescent dough
1 block cream cheese
salt and pepper

Preheat oven to 375 degrees.
Brown and crumble the sausage in a skillet and drain the grease.
Add a pinch of salt and pepper to the cooked sausage.
Add the block of cream and stir until the cream cheese is melted and coating all of the sausage.  Set aside.

On a baking sheet, unroll one package of crescent dough and gently press the seams together.  Spread the sausage mixture over the dough leaving a 1/2" border all around the edges.
Unroll the second package of crescent dough over top of the sausage mixture.  Seal the 1/2" border together and gently press the seams together.

Bake in your preheated oven for 12-15 minutes or until the crescent dough is golden brown.  Remove from the oven and cut into 1-2 inch squares (however big you want your bites).  A pizza cutter makes super quick work of this.  

*If you want to do some prep the night before, you can brown the sausage and keep it in the fridge.  When you're ready, just reheat it in the skillet and add the cream cheese once the sausage has been heated.

Tuesday, August 9, 2016

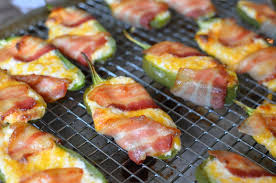
Bacon Wrapped Jalapeño Poppers

Warning: Pregnancy craving recipe.  Our garden is LOADED with jalapeños this year and that makes mama very happy because now we have endless nights of jalapeño poppers in our future!  Give me all the poppers!

6 fresh jalapeños
4oz (1/2 block) cream cheese, softened
1/2 cup shredded cheddar cheese
1 tsp. garlic powder
A few dashes of paprika
kosher salt to taste (just a pinch or two)
6 slices bacon, cut in half
toothpicks (if you're having trouble keeping the bacon in place)

Preheat the oven to 400 degrees.  
Line a baking sheet with aluminum foil (for easy clean up) and place a baking rack on top of the baking sheet.  Set aside. 
Slice the jalapeños in half length wise.  Using a spoon, remove the ribs and seeds and throw 'em out.
In a medium mixing bowl, comine the cream cheese, cheddar cheese, garlic powder, paprika, and salt.  Mix well.  Spoon the mixture evenly among the jalapeños.  
Wrap each jalapeño with half a slice of bacon and secure with a toothpick if necessary.  
Bake 25-28 minutes or until the bacon is cooked and the cheeses are melted.  Most of the time, I turn my oven on broil for 1-2 minutes at the end so the bacon gets good and crispy.

Wednesday, December 3, 2014

Hot Bacon and Cheese Dip

This is AHH-MAZING, my friends.  It's hot and gooey and salty and bacon-y...just make it.  Please.  You will be hugely popular if you take this to your next Christmas party.  I promise!

1 (8oz.) pkg. cream cheese, softened
1/2 cup mayo
1 cup shredded Italian three cheese blend
8-10 slices bacon, cooked and crumbled (slightly large crumbles, please)
Town House Sea Salt Pita Crackers (or your favorite...but these are the bomb)

Preheat oven to 350 degrees.
In a medium mixing bowl, thoroughly combine the softened cream cheese, mayo, and Italian cheeses.  Fold in the bacon pieces.  Spray a shallow baking dish with non stick spray.  Spread the cheese and bacon mixture evenly into the dish. 
Bake in preheated oven for 15 minutes.  Serve warm with crackers.

Friday, October 31, 2014

Ham and Cheese Sliders

I am so sorry.  I don't know why I'm just now getting around to blogging these recipes.  I thought I did it a long time ago.  I've lost my mind, I guess.  This is ALSO from my baby sister's bridal shower that we threw in JULY...(ugh, sorry, 3 months later...) but I guess it's better late than never.  As shower favors, we took this recipe and printed it out on card stock.  We then added a pretty little burlap and lace embellishment to one corner, punched a hole in the other corner, and slid a skinny piece of ribbon through the hole.  Then we tied it to a wooden kitchen spoon.  As everyone left the shower, we gave them the spoon and recipe to take home with them.  They were ELATED to get the recipe.  It's THAT good.

Sandwiches
24 Kings Hawaiian Rolls
24 pieces honey ham
24 small slices of Swiss cheese
1/3 cup mayonnaise
1/3 cup Miracle Whip

Poppy Seed Sauce
1 tablespoon poppy seeds
1 1//2 tablespoons yellow mustard
1/2 cup butter, melted
1/2 tsp. Worcestershire sauce

Split each Kings Hawaiian Roll in half for sandwiches.
In a small bowl, whisk together the mayonnaise and miracle whip.  Spread onto both sides of the center of each roll.  Place a slice of ham and a slice of cheese inside each roll.  Close the rolls and place them in a 9x13 baking dish.  Place them very close together.

In a medium bowl whisk together all of the poppy seed sauce ingredients.  Pour the sauce evenly over all of the sandwiches.  You do NOT have to use ALL of the sauce!  Just use enough to cover the tops.  Let everything sit for 10 minutes; just long enough for the butter to set up a little bit.  Cover with foil and bake at 350 degrees for 12-15 minutes or until the cheese is melted.  Uncover and bake an additional 2 minutes or until the tops of the sandwiches are brown and slightly crispy.  Serve warm.
Note: Sandwiches can be assembled a day ahead and left in the fridge. 

Monday, September 15, 2014

Hot Pepper Jelly and Cream Cheese Spread

Before you think "Ew", just stop.  This is delicious.  I have texture issues and jellies usually make me gag, but THIS is so, so, so, so, yummy, it's ridiculous.  My friend serves this occasionally at girl's nights or Christmas parties and I was always so jealous because her husband is Dutch and I'm pretty sure she told me one time that they get their jelly for this in Holland.  Show off.  So I was bummed that this perfection wouldn't be on my table when I hosted a party or needed something quick to bring somewhere.  Then, I saw it.  In a refrigerator at Costco.  Last year.  Hot Pepper Jelly!!!  It's sweet, yet just a tiny bit spicy, and when you add it to salty cream cheese and top it on a salty cracker, angels begin singing.  It's really, really addicting.   And there is nothing easier than cracking open a jar of jelly and dumping it on top of cream cheese.  

1 or 2 blocks of cream cheese (depending on the size of your party)
1 jar of Hot Pepper Jelly
Assorted salty crackers (my favorite for this is Wheat Thins)

Open your cream cheese block(s) and lay them on a large platter.  If you're using more than one, lay them touching, side by side.
Open your jar of jelly and spoon a nice, thick layer on top.  Go ahead, keep piling it on.  Make sure it reaches from corner to corner.
In a very fancy like manner, lay your crackers all around the cream cheese.
Stick a cute little butter knife on the platter.
Make sure you get a bite of it...because it will disappear quickly!

Saturday, September 13, 2014

Mozzarella and Basil with Marinara Sauce

We've all been there.  You need something quick!  Not a meal...just something to munch on.  Maybe you were invited over to an impromptu game night?  Maybe someone is stopping by?  Maybe you're hosting a New Year's Eve party and you just need something else delicious on the spread?  This is SO EASY and delicious!

8 oz. fresh mozzarella cheese, cubed
2 tablespoons chopped fresh basil leaves (I always use more.)
2 cups marinara sauce (whatever your favorite kind is)
baguette slices

Preheat oven to 350 degrees.
Place the cheese cubes in a shallow 2-quart casserole dish.  Sprinkle with basil.  Spoon the marinara sauce around the cheese.
Bake 8-10 minutes or until the cheese is hot and bubbly.  Serve immediately with baguette slices.

Bang-Bang Chicken

My husband and I occasionally like to treat ourselves to a night out.  Who doesn't, right?  Bonefish Grill is one of our favorite places to go...mainly because of the Bang-Bang Shrimp.  It's DELICIOUS!!  So when I ran across this knock-off recipe online, I had to give it a shot!  The chicken could easily be substituted for shrimp if you're in the mood for shrimp instead.  And that sauce....Mmmm!  This is EXACTLY like having a Bonefish date right at home!  Now, there are a few ways you can enjoy this.
 
1.)  Eat it.  Just as it is.  Right off the plate.  Dipped in the sauce.  They're like grown-up chicken nuggets.  Maybe serve it with a salad and some sort of veggie so you actually feel like a grown up.  Or not.
2.) Warm some flour tortillas.  Sprinkle some shredded romaine lettuce over the tortillas, place some chicken on top of the lettuce, drizzle with the sauce and enjoy it as a Bang-Bang Chicken Taco.
3.)  Serve it as an appetizer.  Layer some whole romaine lettuce leaves over a large platter, place a bowl in the center of the platter filled with the sauce, place the chicken on top of the lettuce leaves surrounding the bowl.  Set out some toothpicks and watch it disappear.  You'll also be very popular.  Bonus!  :)

vegetable oil
1 cup buttermilk (*See my note below.)
3/4 cup flour
1/2 cup cornstarch
1 large egg
1 tablespoon hot sauce (Franks or Tobasco)
salt and pepper to taste
1 lb. chicken breast, cut into 1 inch chunks
1 cup panko, plus more as needed

Sauce:
1/4 cup mayo
2 tablespoons sweet chili sauce (I found it in the Asian section at Wal-Mart.)
1 tablespoon honey
2 tsp. Franks hot sauce

Sauce: Whisk all of the sauce ingredients together and set aside.

Heat about 3/4 cup vegetable oil in a large skillet until hot.
In a large bowl, whisk together the buttermilk, flour, cornstarch, egg, hot sauce, and salt and pepper.  In a medium bowl, pour panko crumbs and set aside.
Working in batches, dip the chicken chunks into the buttermilk mixture and then dredge in the Panko, pressing to coat.  Place the first batch of breaded chicken pieces into the hot oil.  Cook until evenly golden and crisp; about 2-3 minutes per side.  Transfer cooked chicken to a paper towel lined plate.  Continue working in batches until all of the chicken is cooked through.  Serve immediately with the sauce generously drizzled over top.

*Note about the buttermilk.  I NEVER buy buttermilk.  I can't use it all before it goes bad.  So, I make my own.  I know, it sounds ridiculous and very home-maker-ish...I promise it's not.  All you do is mix 1 cup of milk with 1 tablespoon of lemon juice and let it sit for about 5 minutes.  This safely sours the milk and you're left with buttermilk.  Now you never have to buy a container of buttermilk just to throw it away after you've used a small portion of it!  :)