Showing posts with label Low Carb. Show all posts

Tuesday, March 18, 2025

Coleslaw


Whenever Rudi needs a new bone, we always stop by Tommy G's here in Fairbanks and grab him a yummy beef knuckle bone.  They know when I walk in that Rudi is on duty at home and I'm leaving with a treato for the best boy ever.  Their meats are amazing and we were in the mood for their hot dogs tonight.  It's March and we've already had a couple of fool's Springs this year but that isn't stopping us from firing up the grill.  What better to go with a summer hot dog than homemade coleslaw?  Even if it is only 18 degrees.  This recipe is reminiscent of a KFC Copycat so if a creamy coleslaw is your jam, give this one a try!

1/4 cup mayonnaise

1/4 cup milk

4 tsp. white wine vinegar

2 tsp. lemon juice

4 tsp. sugar

2 Tablespoons dried minced onion

1/4 tsp. salt

1/4 tsp. black pepper

1 carrot, peeled and grated

4 cups cabbage, grated

In a large serving bowl, combine the mayo, milk, vinegar,  lemon juice, sugar, minced onion, salt, and pepper.  Whisk until all lumps are gone and the sugar is dissolved. 

Add the carrots and cabbage and toss to coat.

Cover and let sit for 30 minutes before serving.

Saturday, June 8, 2024

Breakfast, Lunch, or Dinner Egg Casserole


This recipe is SO easy to whip up and you probably have all or most of the ingredients already on hand.  We love this dish for any meal, not just breakfast.  It's a go-to lunch for us many days and a great way to use up those farm fresh eggs.

1 pound of sausage, browned

1 stick butter

10 eggs

1/2 cup flour

1 tsp. baking powder

1 tsp. salt

pepper to taste

2 cups cottage cheese

2 cups your favorite shredded cheese

Optional: 

Extra add-ins of your choice: diced bell pepper, small diced onion, 8oz can chopped green chilies, etc.

Preheat your oven to 350 degrees.

In a large cast iron skillet, brown the sausage (and peppers and onions if using) and remove from heat.  Add the stick of butter and allow it to melt while the skillet cools down.  Set aside.

In a medium mixing bowl, whisk the eggs.

Add the flour, baking powder, salt and pepper.  Combine well.

Gently stir in the cottage cheese and shredded cheese.

Pour the egg mixture into the cooled skillet and stir to combine with the sausage and butter.

Place the skillet in the preheated oven and bake for 45 minutes or until golden brown and set in the middle.  

Monday, November 13, 2023

Aunt Norma's Cheese Ball


Thanksgiving is NEXT WEEK and I finally got my hands on my Aunt Norma's cheese ball recipe.  This cheese ball is so good my baby sister HAD to have it for her wedding reception.  We made so many cheese balls that week I dreamt of them for a very long time.  I love to eat this with just a good 'ol Ritz cracker.  

2 pkgs. cream cheese, softened

2 Tablespoons butter, softened

2 jars dried beef, minced

3/4 cup chopped pecans

1 tsp. Worcestershire sauce

1 tsp. dried onion flakes

1 tsp. horseradish

In a medium bowl mix together the cream cheese, butter, Worcestershire sauce, horseradish, onion flakes, and one jar of the minced dried beef.  Form the mixture into a ball.

In a small mixing bowl, combine the remaining minced dried beef and pecans.  Spread the beef and pecan mixture evenly over a flat surface.  Roll the ball around the mixture until the entire surface is covered.  Place the cheese ball on your serving plate, cover, and refrigerate until chilled.  If you're not ready to place it on your serving plate, wrap the ball in plastic wrap and place in the fridge until you're ready to serve.  Serve with your favorite crackers.

Thursday, October 21, 2021

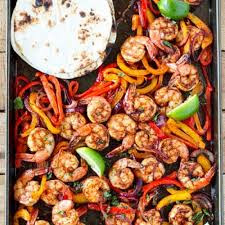
Paleo Sheet Pan Shrimp Fajitas


It is a true tragedy that my husband doesn't like bell peppers in any form.  He misses out on fajitas and I just can't imagine that.  Anyway, I made this recipe for myself for lunches for a few days throughout the week.  They are SO good and addicting I swear I could eat the whole pan...but so far I've managed to not.  You don't have the be Paleo to make this.  You can add all of the traditional non-paleo fajita deliciousness and have a great time.  (Queso anyone?!?!)  But for us Paleo eaters, I eat these on warmed Siete tortillas and I occasionally add some guac if I have an avocado that needs eaten.  


1.5 lbs. frozen shrimp (I'm lazy and use frozen, raw, peeled, deveined shrimp from Costco)

1 red bell pepper, sliced thin

1 yellow bell pepper, sliced thin

1 orange bell pepper, sliced thin (it doesn't matter what colors you have, I LOVE green bell peppers in this too...just use 3 whatever bell peppers you have sliced thin)

1 onion, sliced thin

2 tablespoons olive oil

1 tsp. sea salt

1 tsp. chili powder

1/2 tsp. garlic powder

1/2 tsp. onion powder

1/2 tsp. cumin

1 tsp. Blackening Seasoning

Lime wedges, cilantro, guac (optional)

Begin by preheating your oven to 450 degrees.  Line a baking sheet with aluminum foil and set aside.  

In a small bowl combine all of the seasonings and mix well.

Place the shrimp and sliced veggies on the aluminum foil lined baking sheet.  Drizzle the olive oil all over the veggies and shrimp and toss to coat.

Sprinkle the seasoning mixture over the oil coated veggies and shrimp and toss again, making sure the spices are on everything.  

Roast the shrimp and veggies in your preheated oven for 16 minutes.  Once the time is up, move your oven rack to the top position and turn the oven to High Broil.  Keep a close eye on it and broil for 2-4 minutes or until the veggies and shrimp have some charring.

Serve on warmed tortillas and garnish with your favorite fajita toppings.  

*I'm a sucker for anything on a chip.  I love LOVE to serve this over a bed of warmed Siete tortilla chips like a Fajita Nacho situation.  It's SO good!  

Thursday, September 30, 2021

Egg Roll in a Bowl Soup


I was DELICIOUSLY surprised with how this final recipe turned out.  I really like Egg Roll in a Bowl, but turning it into a soup hits all the right places in the winter time.  I make this in my Instant Pot on the Sauté feature.  You also make the entire thing in one pot so it's super easy clean up!


1lb. ground sausage

1 onion, diced

1 (10oz.) bag shredded carrots

1 green cabbage, sliced into strips

1 head of garlic, minced

6 cups chicken broth

1 tablespoon coconut aminos

1 tsp. garlic powder

2 tsp. onion powder

2 tsp. salt (plus more to taste)


Turn your Instant Pot on the Sauté feature and allow it to get hot.  Add the sausage and brown.

When the sausage is almost done, add the diced onion and sauté until the onion is softened.  

Add the garlic and carrots and sauté until the carrots have slightly softened and the garlic is fragrant. 

Then add the broth, coconut aminos, garlic powder, onion powder, and cabbage to the pot.  Mix well.

Bring the soup to a simmer and allow to cook for 10 minutes or until the cabbage has softened but still has a little bit of a bite to it.

Season with additional salt and onion powder to taste.

Paleo Black Pepper Chicken


If you're craving some Chinese food but have to stay away from all of that sugar, this is an amazing go-to! It's full of veggies, tender chicken, and so much flavor!

My husband doesn't like bell peppers in any form so I subbed those out for yellow squash and zucchini.  But if you like bell peppers, feel free to use them instead.


Chicken Prep:

2lbs. chicken breast, cut into 1 inch cubes

3 tablespoons coconut aminos

1/2 tsp. salt

1 tsp. baking powder

1/2 tsp. garlic powder


Veggie Prep:

2 yellow squash, cut into bite size pieces

2 zucchini, cut into bite size pieces (or if you like bell peppers sub out the squash and zucchini for 2 bell peppers, any color)

8 celery stalks, sliced into one inch pieces on a diagonal

1 onion, chopped into about 1 inch pieces

1 head of garlic, minced

Sauce Prep:

2 tsp. ground black pepper

4 tablespoons coconut aminos

1/4 cup chicken stock

Other:

1/2 cup avocado oil

1/2 cup tapioca starch or arrowroot powder

salt

Fish Sauce (optional)

Combine all of the ingredients for the chicken into a small mixing bowl.  Make sure every piece of chicken is coated in sauce, set aside.

Prepare the veggies and add them all to a mixing bowl.

In a cereal bowl, combine all of the sauce ingredients.

Heat a large skillet over medium-low heat, add the oil and allow it to get hot.  While the oil is getting hot, add the starch to the chicken mixture and combine well.

One by one, add the chicken pieces to the hot oil, being careful not to splatter.  Make sure the chicken is in a single layer and allow them to pan fry for 1-2 minutes per side or until done.  Work in batches if necessary.  Once the chicken is done, transfer it to a plate and set aside.  

If needed, add more oil to the skillet and sauté the veggies with a generous pinch of salt until softened, 3-5 minutes.  

Return the chicken to the pan.  Pour the Pepper Sauce over everything and toss well.  Cook over medium heat for 1 minute.  To finish it off, drizzle 1 tsp. of Fish Sauce and stir.

Taste and adjust seasonings as necessary (I usually add a bit more coconut aminos and salt.)

You can serve this just as it is.  Or if you prefer, you can serve over some cauliflower rice.  If you're not Paleo, serve over Jasmine Rice.  

Thursday, September 23, 2021

Creamy Tuscan Chicken


If you're looking for a tasty, one skillet dinner, this one is delicious!  It's full of flavor, packed with veggies, and even the kiddos love it!  It can be pretty versatile too as far as what kind of chicken you use.  I prefer boneless, skinless thighs.  They have TONS of flavor, they crisp up nice, and they cook a bit faster than boneless skinless breasts.  But use was you have, just adjust your cooking time accordingly.


1.5-2lbs boneless, skinless chicken thighs

2 tablespoons coconut oil

sea salt and pepper

1 tsp. garlic powder

1 tsp. onion powder

1 onion, chopped

1 head of garlic, minced

2 tablespoons arrowroot powder

1 cup chicken broth

1 can full fat coconut milk

1 tablespoon spicy brown mustard 

3 tablespoons nutritional yeast

2 tsp. Italian seasoning 

1 tsp. sea salt

1/2 tsp. black pepper

2/3 cup sun dried tomatoes, roughly chopped

2 large handfuls of baby spinach

cauliflower rice, cooked and seasoned with salt


Season the chicken with sea salt, pepper, garlic powder, and onion powder.  Heat a large skillet over med-low heat, add the coconut oil, and cook the chicken thighs for 5-7 minutes per side until golden brown and cooked through.  Remove the chicken from the skillet and set aside on a plate.

Add additional coconut oil if needed and add the onions to the skillet.  Cook the onions until they're soft, then add the minced garlic and cook for an additional minute.

Whisk in the arrowroot powder and then add the broth and coconut milk.  Stir to combine.  

Add the mustard, nutritional yeast, Italian seasoning, salt, and pepper.  Cook and stir over medium-high heat until it starts to thicken.  Taste and adjust seasoning as necessary.

Add the tomatoes and spinach.  Cook until the spinach is wilted and the tomatoes have softened.  Add the chicken back to the skillet and simmer for 2-3 minutes.  

Serve over seasoned cauliflower rice.

Saturday, September 18, 2021

Nutritional Yeast Salad Dressing


This is a deliciously tangy, full of flavor, easy to make salad dressing that makes any salad exciting!  You'll see 4 cloves of garlic in the recipe but if you know me, 4 cloves of garlic in anything is nowhere near enough.  So if you like a mild garlic flavor, start with 4 cloves.  If you're like me and garlic is life, I add a whole handful of minced garlic to my jar.  

For me, the Apple Cider Vinegar shines through in this dressing and I don't particularly care for the flavor of ACV.  However, you can tame it down by adding liquid stevia extract (I like Pyure) or raw honey to taste.  It's still tangy, still has that garlic spice to it but WAY tames down that ACV.  


1/2 cup extra virgin olive oil

1/2 cup apple cider vinegar

4 cloves of garlic, minced (or as much garlic as you prefer)

3 tablespoons nutritional yeast

1/2 tablespoon sea salt

stevia extract or raw honey, to taste (optional)


Pour the olive oil and apple cider vinegar into a pint sized mason jar.

Add the garlic, nutritional yeast, and salt.  Use a fork and whisk until the oil and vinegar have combined.

Taste.  Begin adding sweetener of choice a little at a time, tasting as you go, if desired.  

Store in the fridge.  Shake well before using.

Monday, September 6, 2021

40 Cloves of Garlic Chicken


Does 40 cloves of garlic sound excessive?  I don't know...maybe to normal people?  I don't think there's such a thing as too much garlic.  This recipe calls for 40 cloves, but I usually throw in a few more just for good measure.  The cloves get nice and browned and have an amazing texture and are slightly sweet...it's seriously amazing!  Busy mom hack, grab a bag of peeled whole garlic at the grocery store.  I get mine at Costco but I've seen them at Aldi too.  I'm sure wherever you shop has them.  It's a HUGE time saver.  Also, the Rosemary is SO GOOD but if you have everything else except for fresh Rosemary sprigs, just leave them out.  But get them for the next time you make it.  


1/4 cup Extra Virgin Olive Oil

8 bone in, skin on chicken thighs

Himalayan Pink Salt or Sea Salt and ground black pepper

40 cloves (*cough cough or more*) of garlic, peeled but left whole

1 cup chicken broth

6 fresh Rosemary Sprigs


Preheat your oven to 350 degrees.

Heat a large, heavy bottomed skillet (I use my largest cast iron) over medium heat and add the olive oil.  Season the chicken liberally with salt and pepper.

Working in batches (don't crowd them) add the chicken to the skillet, skin side down.  Allow to cook until the skin is golden brown, about 6 minutes.  Flip the chicken over and cook an additional 6 minutes.  

Once you've cooked the chicken 6 minutes per side, place the thighs in a 9x13 baking dish.  Do not wipe the skillet!  Keep all of the oil and chicken drippings in the skillet over medium-high heat.  

Toss the garlic into the skillet and cook, stirring or shaking the pan often until the cloves have started to turn a golden brown, 3-4 minutes.  Do not scorch!  Burnt garlic is awful.  You're looking for a nice, golden color.  Once the garlic is done, use a slotted spoon and scatter them as evenly as possible over the chicken thighs.  Keep the pan on medium-high heat.

Carefully add the broth to the hot pan, making sure you stir and scrape up all of those delicious browned bits on the bottom of the skillet.  Cook until the liquid reduces by half, 2-3 minutes.  My reduced liquid is always very salty so I don't add any additional salt or pepper.  However, if you need more salt or pepper, add it now.

Carefully pour the sauce all over the chicken and garlic.  Place the Rosemary sprigs all over the top of the thighs.

Put the chicken in the oven and roast for 35-55 minutes, depending on the size of your thighs and if you cooked them the full 6 minutes per side in the skillet.  35 minutes is usually plenty but check the internal temp.  Once you've reached 165 degrees Fahrenheit on a meat thermometer, you're done!

Let the chicken rest for a couple of minutes before serving.  Make sure everyone gets a healthy helping of those delicious garlic cloves and a generous drizzle of the sauce.  I love to serve this with some sautéed yellow squash and zucchini and a big salad.

Saturday, September 4, 2021

Paleo White Chicken Chili


You'll notice some Paleo recipes coming across the blog as I try new recipes.  My doctor recently put me on a Paleo diet and I was SO nervous about it at first.  I didn't need to be.  It's not that different than how we normally eat.  The biggest change for me is the elimination of dairy (oh sweet cheese how I miss you!) and my morning piece of toast.  But other than cutting dairy and grains, we're big meat and veggie eaters which basically boils down the Paleo diet.  And I have to say, I've been SUPER impressed with all of the recipes we've tried.  This one is SO flavorful and I don't miss the dairy at all.  Give it a shot!

A couple of notes before we get started.  I'm being conservative with the garlic amounts in the recipe.  But you should know that instead of the 4 cloves listed, I add 10-12 cloves.  We are garlic lovers!  I buy the giant bag of fresh, pre-peeled garlic at Costco to save me time in the garlic department.  (Not the pre-minced garlic in a jar...I don't care for that one.)

Also, I don't add heat to this soup.  This recipe is perfect as is, but if you want heat, feel free to add a seeded, diced jalepeno or two to the chopped veggies or a can of diced green chilis with the broth.  Totally your call.


2 Tablespoons coconut oil

1 onion, diced

4 celery stalks, chopped

4 garlic cloves, minced (see note above)

2 jalepeno peppers, seeded and diced (optional)

2 large chicken breasts, cut into bite sized chunks

1 Tablespoon cumin

2 tsp. chili powder

1 tsp. Italian seasoning

1 tsp. pink Himalayan salt or sea salt

1/2 tsp. black pepper

*Helpful hint: put the cumin, chili powder, Italian seasoning, salt, and pepper into a small bowl prior to beginning.  That way you can just dump it on top of the chicken rather than measuring it all out while the chicken is over the heat.

4 cups chicken broth

1 (4oz.) can diced green chilis (optional)

1 (14oz) can coconut milk

Optional Garnishes: Avocado (highly recommend!), cilantro (the more the merrier!), jalepeno rings


Heat the coconut oil in a large pot over medium heat.  

Add the onions, celery, garlic, and jalepenos, if using.  Sauté for about 5 minutes or until tender.

Move the veggies to the side of the pot and add the chicken and the bowl of spices.  Cook the chicken until it has started to brown on all sides.

Add the broth and the can of diced green chilis (if you're using them).  Bring to a boil.

Reduce the heat to medium-low and let it simmer for 10-12 minutes.

Add the coconut milk.  Bring the soup back up to a boil and let it boil at a full rolling boil for 10 minutes until the soup has slightly reduced and thickened.  (It is NOT a thick soup so don't be looking for a chowder consistency...it will just be slightly thicker than broth.)

Remove from heat and serve immediately with the optional garnishes.  

Shrimp and Mixed Greens Salad with Basil Balsamic Dressing


If you're looking for a delicious Paleo salad, look no further!  It's light but filling and the perfect lunch.  If I'm going to be on-the-go or if you pack a lunch for work, this is my favorite to-go salad container!  It keeps everything nice and separated until you're ready to eat so everything stays super fresh.  If shrimp isn't your thing, use whatever leftover protein you have on hand.  Some leftover chicken or steak is also delicious as well as lobster, scallops, crab meat...seriously, any protein you like is perfect!  The salad greens are also so very versatile.  Use whatever you like!  Ok, enough chat, here we go!


Basil Balsamic Dressing:

1/2 cup Olive Oil or Avocado Oil

1/4 cup Balsamic Vinegar

1 tsp. Dijon or Spicy Brown Mustard

1 tsp. dried basil or 1/2 tsp. fresh basil (I LOVE basil so I put WAY more in.)

1 tsp. Lemon juice

1/4 tsp. Sea Salt

1/4 tsp. Garlic Powder


Large Salad:

4-5 cups Organic Mixed Greens (I get mine from Costco)

1 cup (ish) Organic Baby Spinach (I eyeball all of the lettuce amounts)

1 bell pepper, cut into med-large chunks

1 english cucumber, quartered into med-large chunks

1/2 red onion, sliced

10-12 shrimp, cooked (I throw mine in the air fryer sprinkled with some Blackening Seasoning until cooked) or any leftover protein you prefer


For the dressing, combine all of the ingredients into a 2 cup measuring cup.  Whisk until well incorporated.  Set aside.  

In a medium mixing bowl, combine the salad ingredients.  Just before serving, drizzle with as much or as little of the Basil Balsamic dressing as you like.  Refrigerate any leftover dressing.

*If you're packing this for lunch, keep the salad greens and all other ingredients separated until ready to eat.


Thursday, April 9, 2020

Keto Cinnamon Rolls

Alright.  Time to lighten things up again.  I've sampled too many quarantine baking projects and I'm starting to feel it.  Before this COVID mess started I was on a really clean diet and lost 20lbs!  I don't want to relapse!  Time to make some goodies that mama doesn't feel guilty about.  
These little guys are a combo between a cinnamon roll and a pecan swirl?  Remember those?  Tasty Cake, or something like that, made them?  I remember my dad sneaking a sweet on occasion and he really likes pecan swirls.  This reminds me of them a lot!  Only these are guilt free, sugar free, and low carb at only 2 net carbs per roll.

For the Rolls:
2 cups shredded mozzarella
3oz. cream cheese
3/4 cup almond flour
2tsp. baking powder

For the Filling:
4 tablespoons softened butter
1/4 cup chopped pecans (or walnuts)
1 tablespoon cinnamon
2 1/2 tablespoons granulated Swerve

For the Icing:
2oz. cream cheese
3 tablespoons powdered confectioners Swerve
2 tablespoons heavy cream

Preheat your oven to 350 degrees.  Spray 8 cups in a muffin tin with non stick spray.
In a microwave safe bowl combine the mozzarella and cream cheese.  Microwave for one minute then stir to combine.  Add the almond flour and baking powder, stir until somewhat incorporated and return to the microwave for an additional 30 seconds.  Combine the mixture until a soft ball forms.
Place the mixture on a sheet of parchment paper and top it with another sheet of parchment.  Using a rolling pin, roll the dough until you have a rectangular sheet that measures roughly 13x10.  Remove the top piece of parchment paper and discard.

Now the filling!  Spread the softened butter all over the sheet of dough making sure to get all the way to the edges.  Combine the cinnamon and granulated swerve and sprinkle liberally on top of the butter.  Sprinkle the chopped pecans all over the top of the cinnamon and Swerve.

Then, starting on a long edge, begin to tightly roll up the dough into a log.  Cut the log into 8 pieces.  Place one piece per muffin cup.  Bake for 15-18 minutes, until golden brown.

Once they've cooled slightly, it's time for the icing!  Place the cream cheese in a 2 cup measuring cup or small bowl.  Microwave the cream cheese for 15 seconds or so, until it is creamy and can be stirred easily with a fork.  Add the powdered Swerve and heavy cream.  Stir vigorously with a fork until the powdered Swerve is dissolved.  The icing is pretty thick.  If you like it thinner, thin it out with some more cream.  If you like it thicker, add some more powdered Swerve.  Add a generous plop of icing on top of each cinnamon roll and serve!


Monday, December 23, 2019

No-Bake Coconut Caramel Pecan Cookies

You guys.  These. Are. Decadent!  You'd NEVER know there's no processed junk in them.  And SO easy!

1 stick butter
1/3 cup Swerve Brown Sugar substitute (I've also used Date Sugar successfully!)
1/3 cup heavy cream
1 cup pecan halves
1/2 cup unsweetened coconut flakes
Sugar-free chocolate chips

Place the butter in a saucepan over medium heat until melted.  Once the butter has melted, whisk in the Swerve Brown Sugar substitute (or date sugar) and whisk until dissolved. (Note: If you use Date Sugar, it won't dissolve, just mix it in.)
Next, stir in the heavy cream and stir until completely combined.  Let the mixture to lightly boil 8-10 minutes.  
Remove the mixture from the heat and stir in the pecan halves and coconut flakes.  
Using a large spoon, drop spoonfuls onto a parchment lined cookie sheet.  (Note: Some butter will leak out of each cookie as they set.)  Press a few sugar-free chocolate chips into each cookie.  Place the cookies into the fridge for 30-60 minutes until set.  Store in an air tight container in the fridge.  This recipe should yield 11-13 cookies.

No-Bake Peppermint Cheesecake

Merry Christmas!  As we're gearing up to spend our first Christmas in Alaska, I've made some yummy desserts that will also keep our blood sugars low without your sweet tooth making the ultimate sacrifice.  For the past several months our family has really changed the way we've been eating and this pie stays within our new normal.  It's sugar-free, keto, gluten-free, low carb, no-bake, and an option to be nut-free if that's your jam.  

Crust:
2 cups almond flour (or sunflower seeds for the nut-free option)
1/3 cup unsweetened, dutch processed cocoa powder 
1/2 stick butter, softened
1/4 tsp. salt
1/2 cup Swerve Granulated Sweetener

Filling:
2 blocks (16oz.) cream cheese, softened
1 tsp. liquid stevia
8 drops Young Living Peppermint Vitality Essential Oil (Click here to grab the best oils ever!)
1/4 tsp. salt
1 cup heavy cream
1/2 cup Swerve Confectioners Sweetener
2 drops Young Living Peppermint Vitality Essential Oil

Topping:
1/2 cup heavy cream
1/4 cup Swerve Confectioners Sweetener
1 drop Young Living Peppermint Vitality Essential Oil

Optional Extras:
Sugar-free crushed candy canes/peppermints
Sugar-free chocolate bar shavings
Sugar-free chocolate chips

First Step: The Crust
Add all of the crust ingredients to a medium mixing bowl.  (If you have a food processor or bender, throw them in that and blitz/pulse them all together until they make a fine crumb.)  If you're like me, and just moved to Alaska and they're still in storage, a medium mixing bowl will do.  Using your hand, mix and squeeze all of the ingredients together until the butter is fully incorporated.  Give it a taste to make sure it's sweet enough for you.  If not, add some more Swerve.  Press the crust into a 9-inch pie plate and set aside.

Second Step: The Filling
Place the first four filling ingredients into a medium mixing bowl (or your stand mixture with the paddle attachment).  Beat those together until smooth.  Give it a taste and make sure it's sweet enough and pepperminty enough.  If not, add more stevia/peppermint vitality.  Keep in mind, you're going to fold in some whipped cream so if it tastes a little strong, it will be diluted in a second.   Add 1 cup of heavy cream, 1/2 cup Swerve Confectioners Sweetener, and 2 drops Peppermint Vitality to a medium mixing bowl.  Beat until stiff peaks form.  Fold the peppermint whipped cream into the cream cheese filling and place the mixture in the pie crust.  Place the pie in the fridge until you're ready to top.

Third Step: The Topping
Add all of the topping ingredients to a medium mixing bowl and beat on medium-high speed until stiff peaks form.  Taste to make sure you like the sweetness and pepperminty-ness.  Adjust as necessary.  Now, you can either get fancy or just spread it all over the top of your pie.  If you want to be fancy, place your topping in a piping bag with a pretty tip and pipe the whipped cream however you like all over the top of your pie.  If that's not your thing, just spread it all over the top.  You can leave it plain like this, or you can sprinkle some crushed sugar-free candy canes all over it, or shaved sugar-free chocolate bar curls, or sugar-free chocolate chips...whatever you like. 

Wednesday, April 11, 2018

Oven Roasted Green Beans

We've been loving some roasted green beans lately.  It's a great alternative just plain canned green beans (which we also love with a little bit of bacon grease...yum!) and you can do all kinds of fun stuff with them.  Our personal favorite is topped with parmesan cheese and sliced almonds!

Bag of frozen green beans (whatever size will feed your family)
extra virgin olive oil
garlic (powder, sliced cloves, minced...whatever you like)
salt
pepper
parmesan cheese (grated or shredded)
sliced almonds

Preheat oven to 425 degrees.
Line a baking sheet with foil.  
Add a generous amount of olive oil to the foil.  
Place your frozen green beans on top of the oil.
Sprinkle with salt and pepper to taste.
Add garlic powder or cloves (if using).
Use your hands and toss it all around with the olive oil.  If you need more oil, add it...it's soooo good and you want to make sure you have a good coating.
Spread the beans out so that they're in a thin layer.
Place in the oven on the center rack and roast for 10-12 minutes.
Remove the pan and rearrange them a bit so that they don't scorch.  I just take some tongs and mix them around.
Place them back in the oven for an additional 10 minutes.
When they're done, remove from the oven and sprinkle with parmesan cheese and sliced almonds.  Serve hot!

**If I'm serving some sort of Asian dish, I like to add soy sauce and a little bit of crushed red pepper flakes before roasting too...so yum!**

Tuesday, April 3, 2018

Deviled Eggs

These are, hands down, the BEST deviled eggs EVER.  My aunt makes them for every holiday and they are to DIE for!

1 dozen hard boiled eggs, peeled
Woeber's Jalepeno Mustard
mayo
salt
pepper
paprika

Split each hard boiled eggs in half, length wise.
Remove the yolks and place in a medium mixing bowl.
Place the whites on a serving platter and set aside.

Take a fork or a whisk and crumble the yolks until they're all in tiny pieces.
Add enough mayo to make it creamy and at least 3 Tablespoons of the jalapeño mustard. (Side note: the jalapeño mustard doesn't make it spicy at all.  So if you're not into spice, no worries, these are NOT spicy AT ALL.  But there's something about that mustard that just sets this recipe apart from the rest.)
Keep stirring and combining the yolks, mayo, and mustard until it's the consistency you like and the yolks are smooth and creamy.
Add salt and pepper to taste.
Put the yolk mixture into a sandwich baggie and snip the corner off.
Pipe the yolk mixture into the center of the whites.
If you're Team Paprika then sprinkle it on top of all of the eggs.  If you're Team NO Paprika, skip it!

Instant Pot Hard Boiled Eggs

I know...how hard can it be to make hard boiled eggs?  Does it really deserve a blog post?  Yes!  If you use your Instant Pot to hard boil your eggs, you absolutely need to know this method.  So many people do the 5-5-5 method or the 6-6-6 method or a 4-5-4 method....blah blah blah.  I'm a busy mama and don't have time to carefully time eggs.  I'll mess it up because there's always something to distract me.  So here's the easiest way AND it doesn't require you to babysit it.

Eggs, room temp (I do a dozen or two at a time)
1 cup water

Place the trivet in the bottom of your instant pot.  Add the water to the pot.  Place the eggs on top of the trivet.  
Secure the lid, set the valve to sealing, and process on high pressure for 2 minutes.  THAT'S IT!!  2 minutes!!
Allow the pressure to completely release naturally.  (Read: forget about it while you do other stuff)
Once the pressure has released, take your eggs out and store in the fridge.

Chicken Tacos

These guys are our Tuesday night go-to.  Chicken Tacos!  Super super easy and SO good!

2-3lbs. of boneless skinless chicken breasts
1 packet of taco seasoning
1 (16-24oz) jar of your favorite salsa
juice of 1 lime
1/2 cup water
shredded lettuce
diced tomatoes
avocado
sour cream
shredded cheese
hot sauce (we LOVE Cholula Chili & Lime)
cilantro
tortillas (if you're eating a low carb diet, skip these and just serve over a bed of lettuce)

Add the 1/2 cup of water to your instant pot.
Add the chicken (frozen or thawed...either is fine).
Sprinkle the chicken with the packet of taco seasoning.
Dump the entire jar of salsa on top of the chicken.
Secure your Instant Pot lid, set the valve to sealing, and process on high pressure for 15 minutes...20 minutes if your chicken is frozen.
Allow the pressure to naturally release for 10 minutes then quick release the remainder.  Shred the chicken and add it back to the pot.
Serve on warm tortillas or over a bed of lettuce with your favorite taco toppings!

Monday, March 19, 2018

Parmesan Chicken with Bacon Cream Sauce


We LOVE this chicken recipe and my kids devour it.  I mean...it's bacon and cream sauce so everybody wins.

For the chicken:
1lb. boneless, skinless chicken breasts
2 Tablespoons mayo
1/4 cup parmesan cheese

For the Sauce:
3 slices bacon, cooked and crumbled (reserve the fat)
1/2 cup heavy whipping cream
1 Tablespoon cream cheese
1/4 cup shredded parmesan
1/2 tsp. garlic powder
salt and pepper to taste

Preheat the oven to 400 degrees.  Rinse and dry the chicken and place them in a 9x13 baking dish.
Mix together the mayo and parmesan cheese and spread the mixture on top of each chicken breast.  Bake uncovered 40-50 minutes or until chicken is cooked through and juices run clear.

When the chicken has about 10 minutes left to cook, start the sauce.  Warm the reserved bacon grease in a medium skillet.  Whisk in the heavy cream and heat until it starts to simmer around the edges.  Add the cream cheese and whisk until completely melted.  Add in the parmesan cheese, garlic powder, and salt and pepper.  Whisk constantly until sauce begins to boil and thicken.  Remove from heat.

To serve, place a piece of chicken breast on the plate, spoon a generous amount of sauce over the chicken, then sprinkle with bacon pieces.  

**We LOVE to grill so sometimes I'll grill the chicken breast with our favorite grill rub instead of baking it with the mayo/cheese mixture and it's fantastic!

Thursday, January 18, 2018

"Fat Head" Dough

I don't know why it's called Fat Head.  I'm just glad I can still have pizza and it be 100% guilt free.  See, my family and I have been eating "keto" for the past few weeks and WE LOVE IT!  We're about 90% on plan and feeling so much better.  We're probably seeing such great results because we can still have pizza.  So, what is it?  It's basically a dough made primarily from cheese.  Glorious.cheese.  (I love this "diet"!)  It's a very versatile dough.  You can leave it as one big batch of dough and spread it out like a pizza.  You can portion it out into smaller pieces and make personal size pizzas.  You can cut it down to bun size and have an alternative for your burgers and breakfast sammies.  You can make them even smaller and stuff sausage, egg, and cheese in them for a breakfast bite.  You can wrap hot dogs in them for pigs in a blanket.  Hop on Pinterest and see what you can find.  It's super quick to whip up which makes it perfect for a late night quick dinner.  Below are the directions for pizza.  If you want to use it for something else, you'll just need to adjust the thickness as you're rolling it out (bun, biscuit, etc.) and also the baking time.

3/4 cup almond flour
1 3/4 cup shredded mozzarella cheese
2 tbsp. cream cheese
1 egg
pinch of salt
1/2 tsp. Italian Seasoning (if using it for pizza dough)

Preheat your oven to 425 degrees.
Combine almond flour and mozzarella cheese in a microwave safe bowl.
Add in cream cheese and place it in the microwave for 1 minute.
Stir well and microwave an additional 30 seconds.
Add the egg, salt, and Italian Seasoning, if using, and combine well.
Shape the dough into a ball and place it between two sheets of parchment paper.
Roll the dough between the parchment paper until it's about 1/4-1/8" thick (however thick you like your pizza dough)
Remove the top piece of parchment paper.
Keeping the dough on the bottom piece of parchment paper, slide the dough onto a pizza stone or baking sheet.
Use a fork and pierce the dough all over.
Place into the preheated oven for 12 minutes.
Once it's been baked, add your favorite pizza toppings and bake an additional 5 minutes or until your toppings are heated through.